Most homeowners don’t think about their septic system until the smell hits — or worse, until wastewater backs up into the house. By that point, what could have been a small, manageable issue has turned into an expensive emergency. Understanding the components of a bio septic tank before something goes wrong is one of the smartest preventative steps you can take for your property, your finances, and the surrounding environment.
A bio septic tank is not just a modern upgrade. It’s a biologically engineered wastewater treatment system designed to work efficiently, quietly, and sustainably for decades. But here’s the reality: the system only performs as well as each individual component inside it. Every chamber, pipe, baffle, and bacterial colony has a specific role. If one fails, performance drops across the entire chain.
This guide explains every essential component clearly and practically — from inlet to outlet — so you understand exactly what’s happening underground.
What Is a Bio Septic Tank?
A bio septic tank is an on-site wastewater treatment system that uses natural biological processes — primarily microorganisms — to break down and treat sewage before it is discharged into the soil.
Unlike conventional septic tanks, which rely mostly on gravity and physical settling, bio septic systems actively digest organic waste. This results in:
-
Cleaner effluent
-
Lower sludge accumulation
-
Reduced environmental risk
-
Longer drain field life
-
Lower long-term maintenance costs
The difference isn’t minor. Conventional systems settle solids. Bio septic systems treat them.
The Complete Bio Septic Tank Components Explained
A properly designed bio septic tank consists of multiple chambers and supporting components working together in sequence.
1. The Inlet Chamber — Where Everything Begins
Every drop of wastewater from your sinks, toilets, showers, and appliances enters the system through the inlet chamber.
Function of the Inlet Chamber
Its job is to:
-
Receive raw wastewater
-
Reduce flow velocity
-
Prevent turbulence in downstream chambers
-
Begin initial separation
If wastewater enters too forcefully, it disrupts the sludge and scum layers in the primary chamber. That disruption reduces treatment efficiency.
The Inlet Baffle (T-Pipe)
This small but critical component directs incoming wastewater downward instead of allowing it to splash across the surface. Without it, floating debris can move prematurely toward the outlet.
Common inlet pipe materials include:
-
PVC
-
ABS
-
Cast iron (older systems)
-
Clay (very old systems)
Proper pipe slope is essential. Too steep, and solids don’t settle. Too shallow, and blockages form.
2. The Primary Treatment Chamber — Solid and Liquid Separation
Once wastewater enters the primary chamber, gravity begins doing its work.
Over 24–48 hours:
-
Heavy solids sink (forming sludge)
-
Light materials float (forming scum)
-
Liquid effluent remains in the middle
Three distinct layers develop:
|
Layer |
Position |
Description |
|---|---|---|
|
Scum |
Top |
Fats, oils, grease |
|
Effluent |
Middle |
Partially treated liquid |
|
Sludge |
Bottom |
Heavy solids |
Anaerobic bacteria begin breaking down organic solids in the sludge layer. However, digestion is not complete — which is why periodic pumping is still required.
A critical maintenance rule: if sludge reaches 30% of total liquid depth, pumping is necessary.
3. The Bio-Reactor Chamber — The Biological Engine
This is the heart of the bio septic tank.
The bio-reactor chamber contains a thriving community of microorganisms responsible for digesting dissolved organic waste.
The Biological Breakdown Process
Anaerobic digestion occurs in four stages:
-
Hydrolysis
-
Acidogenesis
-
Acetogenesis
-
Methanogenesis
Each stage converts complex organic waste into simpler compounds, eventually producing methane and carbon dioxide.
This biological cascade significantly reduces:
-
BOD (Biochemical Oxygen Demand)
-
Suspended solids
-
Pathogens
When functioning properly, a bio septic tank can reduce BOD by 60–80% or more.
What Damages the Bacterial Colony
The bacterial community is living — and fragile.
Substances that harm it include:
-
Bleach
-
Antibacterial cleaners
-
Antibiotics
-
Harsh drain chemicals
-
Paint and solvents
-
Excess grease
If the bacterial population collapses, treatment efficiency drops quickly.
4. Bio Media — The Surface That Makes It All Possible
Modern bio septic systems often include bio media inside the bio-reactor chamber.
Bio media provides massive surface area for bacteria to colonize. The bacteria form a biofilm — a thin biological layer that actively treats wastewater.
- Common types of bio media include:
-
Plastic moving bed media
-
Ceramic rings
-
Foam cubes
-
Structured plastic sheets
More surface area means:
-
More bacterial growth
-
Faster treatment
-
Cleaner effluent
-
Reduced sludge production
Bio media should never be aggressively cleaned. Harsh washing destroys the biofilm and resets treatment performance.
5. Aeration System (In Aerobic Bio Septic Tanks)
Some bio septic systems use aerobic treatment, which introduces oxygen into the chamber.
An air pump pushes air through diffusers, creating fine bubbles that supply oxygen to aerobic bacteria.
Benefits of Aerobic Treatment
-
Faster waste breakdown
-
Higher effluent quality
-
Reduced odor
-
Lower sludge accumulation
However, aerobic systems require electricity and mechanical maintenance.
If the air pump fails, oxygen levels drop within 24–48 hours and treatment efficiency declines.
6. The Outlet Chamber — Final Clarification Stage
After biological treatment, wastewater enters the outlet chamber.
This chamber allows:
-
Final particle settling
-
Effluent clarification
-
Safe discharge preparation
The outlet baffle prevents scum and solids from leaving the tank.
Effluent exiting a healthy bio septic system is significantly cleaner than conventional systems.
7. Ventilation and Gas Management
Anaerobic digestion produces gases:
-
Methane
-
Hydrogen sulfide
-
Carbon dioxide
Proper ventilation prevents:
-
Pressure buildup
-
Indoor odor intrusion
-
Explosion risks
-
Toxic gas exposure
Vent pipes must extend above roof level and remain unobstructed.
Strong odors typically indicate:
-
Blocked vent
-
Hydraulic overload
-
Bacterial imbalance
A properly functioning system should produce minimal noticeable odor.
8. Distribution Box (D-Box)
The distribution box splits outgoing effluent evenly into multiple drain field lines.
If one line receives too much flow:
-
Soil becomes saturated
-
That section fails prematurely
Even distribution protects the drain field and extends system lifespan.
9. Drain Field — Nature’s Final Treatment Stage
The drain field (leach field) is where treated effluent percolates into soil.
Soil provides:
-
Final filtration
-
Pathogen reduction
-
Nutrient absorption
What damages drain fields:
-
Grease carryover
-
Tree roots
-
Driving over the area
-
Hydraulic overload
-
Poor upstream maintenance
Drain field replacement is one of the most expensive septic repairs. Protecting upstream components is essential.
10. Inspection Ports and Access Risers
Modern systems include access risers that extend to ground level.
They allow:
-
Easy inspection
-
Sludge measurement
-
Pumping access
-
Component checks
Without risers, excavation is required for each inspection.
Tank Materials
Bio septic tanks are typically made from:
Concrete
-
Durable
-
Heavy
-
Long lifespan
-
Susceptible to acid corrosion over decades
HDPE
-
Lightweight
-
Corrosion resistant
-
Flexible
-
Requires anti-buoyancy measures
Fiberglass (FRP)
-
Strong
-
Lightweight
-
Corrosion resistant
-
Premium option
Material selection affects longevity and installation cost.
How All Components Work Together
Step-by-step treatment flow:
- Wastewater enters through inlet.
- Solids settle in primary chamber.
- Biological digestion occurs in reactor.
- Effluent clarifies in outlet chamber.
- Distributed evenly to drain field.
- Soil completes final treatment.
Total treatment time: approximately 3–7 days.
Maintenance Schedule
Monthly:
-
Check for odors
-
Inspect drain field surface
Quarterly:
-
Inspect air pump (if applicable)
Annually:
-
Professional inspection
-
Effluent check
Every 3–5 years:
-
Pump tank
Proper maintenance dramatically reduces failure risk.
Warning Signs of Component Failure
|
Symptom |
Possible Cause |
|---|---|
|
Slow drains |
Inlet blockage |
|
Strong odors |
Vent issue or overload |
|
Wet yard |
Drain field saturation |
|
Alarm triggered |
Pump failure |
|
Sewage backup |
System overload |
Early action prevents major expense.
Final Thoughts
A bio septic tank is not a single container buried underground. It is a coordinated biological treatment system made up of multiple carefully engineered components.
Each part matters:
-
Inlet regulates flow
-
Primary chamber separates solids
-
Bio-reactor digests waste
-
Media supports bacteria
-
Outlet clarifies effluent
-
Drain field completes treatment
When maintained properly, these systems can operate efficiently for decades with minimal intervention.
The key difference between a septic emergency and decades of smooth operation isn’t luck. It’s understanding how the system works — and protecting every component inside it.
Know your system. Maintain it properly. And it will quietly protect your property and environment for years to come.
FAQS
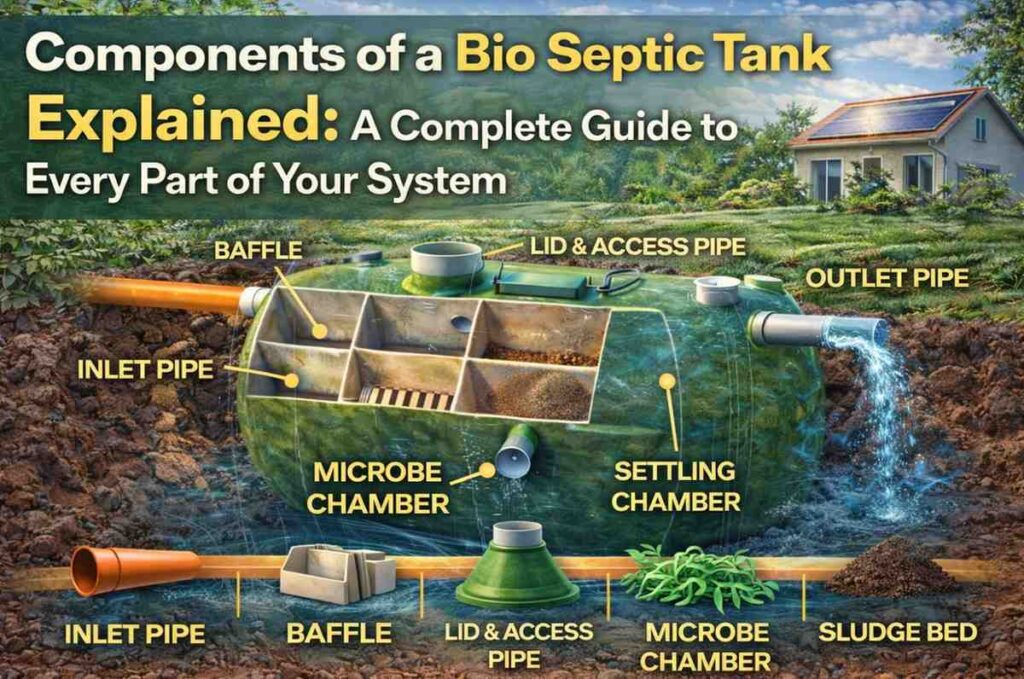
A bio septic tank isn't just a single buried box — it's a carefully engineered sequence of chambers and parts, each with a specific job to do. The main components of a bio septic tank system include the inlet pipe and inlet chamber, which receives raw wastewater from the property; the primary settlement chamber, where solids sink and fats float through gravity separation; the biological treatment chamber (bio-reactor), where living bacteria actively digest organic waste; the bio-media filter, which provides a structured surface for bacterial colonies to thrive; and the outlet chamber, which gives treated effluent a final settlement before discharge.
Supporting these core chambers are several critical components: the ventilation or vent pipe system to safely remove gases like methane and hydrogen sulfide, the aeration system in aerobic bio septic tanks (including the air pump and diffusers), the distribution box for even effluent spreading across drain field lines, and the drain field (leach field) itself — where soil provides the final stage of natural filtration.
Modern systems also include access risers and inspection ports for easy maintenance access, high-water alarms to alert homeowners to pump failures or overflows, and control panels in advanced aerobic treatment units. Every one of these components plays an irreplaceable role. Neglect or failure of even a minor part — like a cracked outlet baffle or a blocked vent pipe — can compromise the entire system's performance. Understanding the full bio septic system parts list is the first step toward protecting your investment long-term.
The number of chambers in a bio septic tank varies depending on the system design, the treatment standard required, and local regulations — but most residential bio septic tanks contain two to four chambers. Each chamber performs a distinct treatment function, and the multi-chamber design is precisely what gives bio septic tanks their treatment advantage over single-chamber conventional systems.
Here's how a typical multi-chamber bio septic system breaks down:
| Chamber | Function |
|---|---|
| Chamber 1 — Inlet/Primary Settlement | Solid-liquid separation, sludge and scum formation |
| Chamber 2 — Biological Treatment (Bio-Reactor) | Anaerobic or aerobic bacterial digestion of organic matter |
| Chamber 3 — Secondary Settlement (Clarifier) | Final particle settlement, effluent clarification |
| Chamber 4 — Pump Chamber (optional) | Effluent storage and timed dosing to drain field |
A two-chamber design is the minimum for a functional bio septic system — primary settlement in the first tank, biological treatment and outlet in the second. This is common in smaller residential applications. A three-chamber design adds a dedicated secondary settlement stage, producing significantly cleaner effluent. A four-chamber system, often seen in advanced aerobic treatment units (ATUs), adds a pump chamber for controlled, dosed effluent delivery to the drain field.
The baffle walls between chambers are as important as the chambers themselves. These internal dividers — made from concrete, PVC, or fiberglass — direct flow through the system in a controlled path, prevent short-circuiting (where incoming wastewater bypasses treatment and goes straight to the outlet), and stop floating scum and settled sludge from moving between chambers prematurely. When people talk about bio septic tank chamber design, the baffle wall configuration is often the most important engineering detail in the entire system.
In short — more chambers generally means better treatment quality, longer drain field life, and a lower environmental impact. It also means a higher upfront cost, which is why selecting the right number of chambers for your site conditions and regulatory requirements matters from day one.
Bio media is one of the most important — and least understood — components of a modern bio septic tank system. Simply put, bio media is a structured physical material installed inside the biological treatment chamber to provide an enormous surface area for bacteria to colonize. Instead of bacteria floating freely in the wastewater (which is inefficient), they attach to the surface of the bio media and form a dense, living layer called a biofilm. This biofilm is where the real biological treatment happens.
Think of it this way. A handful of plastic bio media rings might have the same external dimensions as a tennis ball — but thanks to their complex internal structure of fins, channels, and holes, they offer hundreds of times more surface area than a smooth sphere the same size. More surface area means more bacteria. More bacteria means faster, more thorough biological treatment of the organic waste passing through.
Common types of bio media used in bio septic tanks:
- Kaldnes/K1 plastic rings — the most widely used in modern systems; high surface area (500–900 m² per m³), excellent durability, lightweight, and in aerated systems they tumble freely through the water keeping the biofilm healthy and evenly active
- Ceramic bio balls — dense, high surface area, good for passive (non-aerated) systems
- Polyurethane foam cubes — cost-effective, reasonable surface area, but shorter lifespan than plastic or ceramic options
- Structured plastic sheets — the highest surface area option, used in larger or commercial systems
- Gravel — the traditional option, still used in simpler systems, but offers far less surface area than modern engineered media
Bio media matters because without it, biological treatment relies entirely on suspended bacteria floating in the wastewater — a much less efficient and less stable process. With quality bio media in place, your system maintains a large, stable bacterial population even through disturbances like fluctuating water usage or mild temperature changes. The biofilm community is more resilient than suspended bacteria and recovers faster from disruptions.
One critical maintenance point: never aggressively clean bio media. The biofilm it hosts took weeks or months to establish. Pressure washing or disinfecting the media destroys it entirely. If bio media needs cleaning, gentle rinsing with unchlorinated water is the appropriate approach — removing gross fouling without stripping the biofilm.
The inlet and outlet are the entry and exit points of your bio septic system — and while they might seem like simple pipe connections, both incorporate specific design features that have an outsized impact on how well the entire system performs.
The Inlet — Controlled Entry
The inlet pipe carries all raw wastewater from your property into the first chamber of the bio septic tank. Its job isn't just to get wastewater into the tank — it's to do so in a controlled way that protects the treatment process happening inside. The inlet baffle (or inlet T-pipe) is the key feature here. Positioned just inside the first chamber, the inlet baffle directs incoming wastewater downward into the middle of the chamber rather than letting it splash across the surface.
Why does this matter? Without a baffle, the force of incoming wastewater would disturb the scum layer floating on top and the sludge settling on the bottom — stirring them back into the effluent and dramatically reducing treatment efficiency. The baffle keeps those layers undisturbed, allows proper three-layer separation to occur, and prevents floating debris from being pushed prematurely toward the outlet.
The inlet pipe must also be installed at the correct gradient — typically a slope of 1:40 to 1:60 (roughly 1.5–2.5%). Too steep and solids move too fast, getting swept into the tank without settling in the pipe. Too shallow and solids accumulate in the pipe itself, causing chronic blockages that present as slow drains throughout the entire house.
The Outlet — Controlled Exit
The outlet is where treated effluent leaves the tank system and heads toward the drain field. The outlet T-pipe or outlet baffle works on the same principle as the inlet baffle but in reverse — it draws effluent from the mid-depth of the outlet chamber, below the surface scum layer and above any residual settled solids. This ensures only the cleanest, most thoroughly treated liquid exits the system.
The outlet pipe's invert level (the height at which it draws from the chamber) is a critical installation detail. Set it too high and floating scum exits with the effluent, clogging the drain field. Set it too low and settled sludge gets drawn out, with the same catastrophic result. The effluent outlet pipe should sit approximately 30–50% of the liquid depth from the chamber floor, depending on the specific system design.
Together, the inlet and outlet components act as the system's gatekeepers — one controlling what enters and how, the other controlling what leaves and ensuring it's clean enough to be safely discharged. A cracked baffle, a missing T-pipe, or an incorrectly positioned outlet are among the most common causes of bio septic system underperformance — and among the easiest to fix when caught early during routine inspection.
Understanding how a bio septic tank works step by step transforms it from a mysterious buried box into a logical, understandable system. Here's the complete treatment journey — from the moment you flush to the point where treated water safely rejoins the environment.
Step 1: Wastewater Leaves the Property Every drain in your home — toilets, sinks, showers, dishwashers, washing machines — connects to the main drain that runs out to the bio septic system. This combined flow of blackwater (toilet waste) and greywater (sinks, showers, laundry) travels through the inlet pipe toward the tank. The pipe's slope ensures gravity keeps the flow moving without accumulation.
Step 2: Entry Through the Inlet Chamber Incoming wastewater hits the inlet baffle, which slows its velocity and directs it downward into the primary chamber. This controlled entry protects the treatment process that's already underway inside the system.
Step 3: Primary Settlement — Solid-Liquid Separation In the primary chamber, gravity separates the wastewater into three layers over a retention period of 24–48 hours. Heavy solids sink to form the sludge layer at the bottom. Fats, oils, and lightweight materials float to form the scum layer at the top. Partially clarified liquid — the effluent — occupies the clear middle zone. Anaerobic bacteria in the sludge layer begin digesting the settled solids, but this chamber's primary role is physical separation, not biological treatment.
Step 4: Biological Treatment in the Bio-Reactor Chamber Effluent from the primary chamber flows into the biological treatment stage — the defining feature of the bio septic tank system. Here, communities of bacteria (anaerobic in standard bio tanks, aerobic in ATU systems) attack and break down the dissolved organic compounds remaining in the effluent. In aerobic systems, an air pump continuously delivers oxygen through diffusers to support the aerobic bacterial community. Bio media installed in this chamber provides a massive colonization surface, keeping the bacterial population large, stable, and efficient. BOD levels drop by 60–95% in this stage depending on system design.
Step 5: Secondary Settlement in the Outlet Chamber Biologically treated effluent passes into the outlet chamber for final clarification. Any fine particles that remain after biological treatment are given one last opportunity to settle out. The calm conditions in this chamber produce the cleanest possible effluent before it exits the tank. The outlet T-pipe draws from the clear mid-zone, ensuring only high-quality treated water proceeds to discharge.
Step 6: Distribution to the Drain Field Treated effluent exits through the outlet pipe and — if the system includes one — passes through the distribution box, which splits the flow evenly across multiple drain field trenches. In systems with an effluent pump, a timer or float control doses the drain field at set intervals rather than continuously, which actually improves drain field performance by allowing recovery time between doses.
Step 7: Final Treatment Through Soil Effluent percolates downward through the gravel bed in the drain field trenches and into the surrounding soil. The soil provides the final treatment stage: physical straining of any remaining particles, further biological treatment by soil bacteria, chemical neutralization of pathogens, and gradual movement of now-clean water toward the water table or uptake by plant roots.
Total treatment time from inlet to soil discharge: approximately 3 to 7 days, depending on system size, temperature, biological activity, and soil permeability.
The elegance of the bio septic tank working process is that — in a healthy, properly maintained system — this entire sequence runs continuously and silently, 24 hours a day, 365 days a year, with nothing more than bacteria, gravity, and (in aerobic systems) a small air pump doing all the work.